


Introduction
This was part of a team project I did in my senior year where our team created an RPG game. It was a one semester project created in Unity Engine. I was mainly responsible for the level generation of the game. Most terrain generation I see in games creates wide open levels meaning that if the player wants to go somewhere, they simply walk in that direction. This is fine for sandbox games like Minecraft, but makes for an extremely dull world for an RPG game since they require more intention. This motivated me to explore the possibility of adding more level design into procedural generation to create a world more fit for an RPG.
Foundation
The foundation for the map generation uses the same seeding method I made when making infinite generation. However the seeding is slightly different so that it creates a finite world that wraps seamlessly with itself.

Creating Distinct Areas
Since my goal was to create a more RPG inspired world, I knew that I wanted to generate areas separated in some way so that they are distinct. My vision of this was different biomes separated by mountains, with paths connecting regions together. An easy way to do this is by generating a Voronoi Diagram. Doing this creates the foundation for these areas, and as part of the calculation, the distance from the center point is stored which will be used for later procedures.

The next step was to divide these regions by representing the mountains in the map. The idea I came up with was to generate a pseudo polygon inside each region. To do this I create vertices for the polygon at each region’s center point and then step outwards until reaching the border of the region. Finally, I scale the positions down and get the following:

Next, I chose a biome to represent the region, and create a new map to store the biome of each location. For each pixel, the angle from the region’s center is calculated. Using that angle, we can get a distance from the appropriate vertices of the polygon and compare it with the locations distance that was stored when creating the Voronoi Diagram. If the pixel’s distance from the center is less than the polygon, then we know the pixel is inside the polygon. The result is a more organic shape than the original Voronoi Diagram that looks like this:

Generating the Heightmap
With these shapes generated from polygons, the leftover gray space is the mountain biome which will separate each area. With this foundation, I moved to creating the heightmap for the terrain. I created a table which specifies a height for each biome type which will be used to start off the heightmap.

The mountain region is assigned the lowest value on the map since I wanted to assign the values with a different method altogether. Without going into much detail, the idea was to take the minimum value between two slopes to create a triangular shape.

After doing this on the 2D heightmap, I got the following results:

This is a good framework, but it looks very geometric and unnatural still. To solve this I created a brush system which works how you would imagine a simple painting program could work; you create a brush, specifying the size and type, and clicking the canvas changes the values in some way. I only made 2 brush types: round and flat. Both effect a circular region, but the round brush has diminishing strength while the flat doesn’t. Additionally I specified a variety of “operations” a brush can do to suit various needs for heightmap modification. These operations could be simple ones like adding or subtracting, but I also added more conditional operations like “elevate”, which works like add, but only changes the lowest points. This brush system could be expanded on heavily, but for the sake of time and scope I kept it fairly simple. Using the brushes, I made terraces on the mountains using a flat-elevate brush, and gave the areas small lumps using a round-add brush:

Next, I created paths that connect regions with their 4 neighbors so that the player can actually access other areas. Paths are generated with some constraints that reduce steepness. Like the pseudo polygons I created earlier, paths are also represented purely by points. Once a path is done generating many points, the brush system is used to set the height on each point.

Hydraulic Erosion
Hydraulic erosion was used on the final heightmap to give the terrain a more natural look. I used Sebastian Lague’s video on the subject for a high concept introduction and implemented it from there. With my implementation of hydraulic erosion variables can be adjusted so accuracy can be traded for runtime in order to find what worked best. In order for generation times to be short, each simulated drop is really strong so that less has to be simulated to get the desired effect. Despite the accuracy tradeoff, the terrain still gets a significant visual improvement. Here is a before and after comparison:

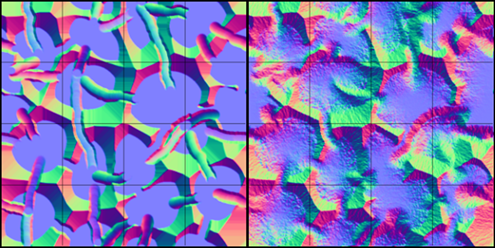
Raindrops use the same grid based seeding to generate. However, the bounds are not easily contained as small changes cause a butterfly effect. This causes the border of the heightmap to have seams which is bad. Fortunately, the seams are minimal, and doing some post processing removes them without any noticeable changes. However, the post processing limits the world to be generated on one map, so a better solution would be needed to keep the map generation scalable. For our game, the world size was small enough to generate on just one map so it was fine.
Additional Maps
After a heightmap is created, many more useful texture maps can be created. One is the normal map which is required once creating the mesh of the terrain. Another map that can be calculated is a “steepness map”, which just averages slopes around each height to get an average slope. The result looks like this:

This map will be useful for creating the color map since it detects cliffsides. Aside from that, we can assign color based off of the biome map and height map. Finally the colors are blurred to give the terrain a softer look.

Object Placement
The final part to creating the world is placing objects inside of it. This ranges from decorative foliage, to invisible objects which spawn enemies. The process for placing most objects is to start with lots of sample positions, then to either eliminate or score those samples. If eliminating samples, the remaining ones are used to place objects. If scoring samples, some amount of the highest scoring samples are used to to place objects. Since foliage is less important, I use elimination based sampling, but for things like enemy spawn locations, I use scored samples since it guarantees a controllable amount.
For foliage, random positions on the map are generated, and from those points, a gaussian distribution creates samples around the point to give it a more natural look. To eliminate samples, specific maps are indexed; an example would be using the steepness map and eliminating a tree sample if the ground isn’t flat enough.

For enemy spawners, each area creates a list of samples, each sample gets scored and the two highest scoring spawners are chosen to be placed in the level. This is important because it removes the possibility of edge cases such as zero spawners being placed or way too many being placed. Scoring can be laid out like a checklist where each field adds or deducts a set amount points, or they can have fields where the score changes by a calculated value. It takes some trial and error to get the scoring function working well for what you want, but the consistent results and control is very useful. Another important detail is that its slower to process scored samples, so it would be very inefficient to use scoring for something like grass.

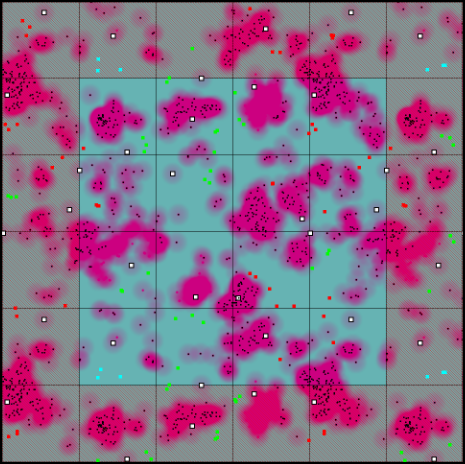
A useful map that I thought of while working on object placement was an “object density map”. The idea is that when large objects are placed, they mark this map and the area around them. This allowed me to avoid placing enemy spawners in heavily forested areas. This is what the map looks like:
Mesh Generation and Management
With the all of the necessary maps finished, the mesh for the heightmap can be created. In order for the world to be scalable, the world is divided into chunks. Each chunk starts as a basic vertex plane, where each vertex in the plane corresponds to a pixel in the maps. from this, the vertices read from the heightmap to get their z value, the color map to get their vertex color, and the normal map to get the vertex normal. The process is repeated for 2 additional Levels of Detail, each cutting the dimensions of the plane in half, and averaging values of the previous LoD (normals are renormalized).

Once the meshes are created, they are saved as binary files. As the player moves around the world, chunks are loaded in and out and LoDs are swapped. Since the world was generated to wrap, the chunks are positioned to handle this. The enemies in our game use a navmesh for pathfinding which means the navmesh needs to update at runtime as chunks load in. To remove lag, only the highest LoD was used when generating the navmesh.

Level Progression
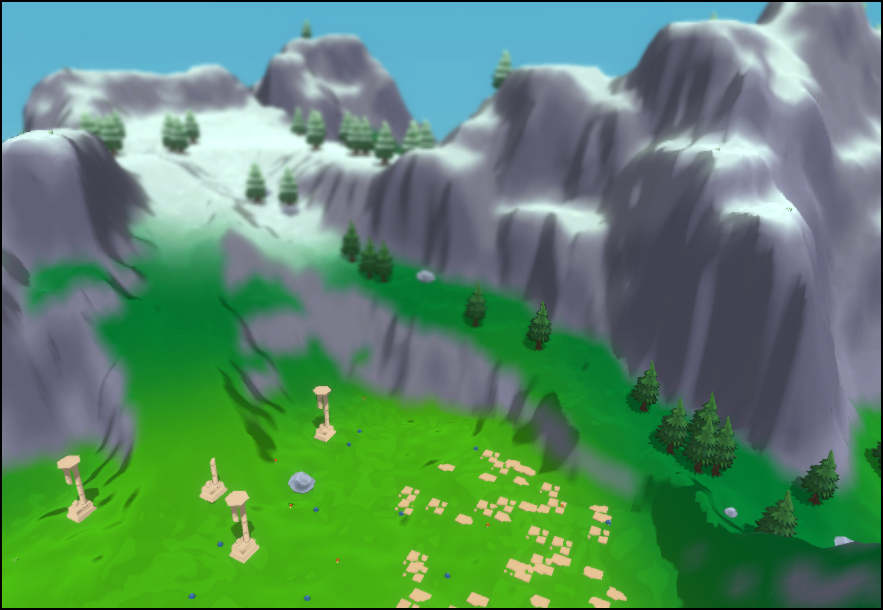
Up until now, I’ve glossed over the actual RPG design present in the level creation. With everything necessary to add a variety of biomes, control heights and object placement, it is easy to get a simple difficulty progression in the world. There are 3 enemy difficulties present in our game, easy, medium and hard. This means we also have 3 difficulties of enemy spawners, so when placing these objects, I look at which biome its being placed in and select the appropriate one. I also decided to correlate the elevation to the difficulty so the high up snowy regions is the hardest area.
Final Thoughts
Overall I’m pretty satisfied with how this world generation turned out. That being said, there’s plenty of things I would add and remove or change going forward.
As far as things to remove or change, that would be world wrapping and the region layout. World wrapping was fairly easy to implement on the terrain side of things, but became a headache when moving to multiplayer networking. Even ignoring the networking bugs that we had to fix, it didn’t add a whole lot. It would be simpler to generate the level as a continent surrounded by ocean. I would also want to change how regions are laid out. The method of doing grid based seeding, creating a Voronoi Diagram, then shaping the biomes out of that worked pretty well, but the grid restricts the sizes and positioning of the regions making it feel more repetitive. To change this I would probably try postpone generating maps and layout the world purely with vectors and shapes with some kind of recursive or nested approach.
There are lots of things that could be added onto this project if the game were scoped larger. Some ideas include blocking off the paths to areas for an NPC to remove after completing a side quest, having dungeon entrances, more biomes, oceans and rivers, or towns. The list goes on, but to have all of this in our project would be over scoped. There are things that I already have in here that could be improved such as the path generation. I attempted to give the paths some curvature, but they are very straight. It would be much more interesting if the paths were more curved and varied. Another thing to improve is optimizing the generation process more. Compared to methods like layering Perlin Noise, this approach is much slower to generate.
To conclude, the final product suits an RPG well and helps control the experience better than layered Perlin Noise can, but takes longer to program the involved systems, as well as longer to generate.
